Wednesday, November 17, 2010

I'm baking.

Have you thought about breakfast munchies for your loved ones while they are waiting for the turkey to cook? They will love this pound cake, and you can bake it the day before.

Lemon Poppyseed Pound Cake

Baking spray

1 cup granulated white sugar – 7 oz.

1/3 cup butter, softened

2 large eggs

1 Tbsp. grated lemon rind, from 1 large lemon

1 tsp. vanilla extract

1 2/3 cups flour (4.5 oz. a.p. flour and 2 5/8 oz. cake flour, for a total of 1 2/3 cups)

2 Tbsp. poppy seeds

1 tsp. baking powder

½ tsp. baking soda

¼ tsp. kosher salt

¾ cup low-fat buttermilk – 6.25 fl.oz.

Glaze

2/3 cup granulated sugar – 4.5 oz.

Juice of one large lemon, about ¼ cup

1 Tbsp. unsalted butter


Coat a 9x5 loaf pan with baking spray. Pre-heat oven to 300°.

Beat butter and sugar on medium speed of stand mixer until well blended, about 4 minutes. Add eggs, one at a time, and beat well after each addition. Beat in lemon rind and vanilla.

Combine flour and next four ingredients in another bowl. Add 1/3 flour, beat, add ½ buttermilk, beat, and repeat, ending with flour. Pour batter into prepared pan. Bake at 300° for 40 minutes, then turn oven to 325° and bake for another 30 to 40 minutes, until golden brown and toothpick inserted near center comes out clean.

Let cool 10 minutes. Turn out onto wire rack, and poke holes all the way through the cake using a skewer. Brush glaze over cake, until all glaze has been absorbed, and while cake is still warm.

Glaze

Combine lemon juice and sugar in a glass measuring cup, stir well and let rest while cake cooks. When you remove cake from oven, stir lemon sugar mixture again, and place in microwave for 1 minute. Remove; stir, until all sugar is dissolved. Stir in 1 Tbsp. room temp. butter, until incorporated. Let cool along with cake. Poke the cake, and brush over the warm cake, then cool completely. Brush lightly around all sides, too.

Sunday, November 7, 2010

Moist, delicious and addictive cookies for the Holiday Table.

Who doesn't love these Honey Crisp apples? These are the MOST addictive apple I have ever eaten, and I'm not alone in thinking this. Everyone should try these. I decided to use one for this recipe, and once again, we couldn't stop eating these cookies, either. Apple crack? Yeah, that's gotta be it.
And unlike me, they don't get old or dried out, but they do seem to get even better, if that's possible, so these will last through a holiday weekend, if you make enough. teehee

Apple Cookies:


 1/2 cup shortening

 1 1/3 cups packed brown sugar

 1 egg

 1/4 cup milk

 2 cups all-purpose flour

 1 teaspoon baking soda

 ½ tsp. kosher salt

 Scant 1/8 teaspoon ground nutmeg

 1 teaspoon ground cinnamon

 Scant 1/8 teaspoon ground mace

 1 cup chopped pecans

 1 cup finely diced or shredded, peeled Honey Crisp apple ( 1 apple)

 1 cup raisins

Vanilla Glaze:

 1-1/2 cups confectioners’ sugar

 1 tablespoon butter, melted

 1/2 teaspoon vanilla extract

 1/8 teaspoon kosher salt

 2 to 4 teaspoons frozen apple juice concentrate, thawed but not diluted, and then warmed in the microwave (10 seconds)

Directions:

1. Preheat oven to 400 degrees F.

2. In the bowl of a stand mixer fitted with the paddle attachment, cream shortening and brown sugar until light and fluffy, about 10 minutes. Add egg and milk and beat until combined.

3. In a medium bowl, combine the flour, salt, baking soda, nutmeg, cinnamon and mace. Gradually add to the creamed mixture and mix well. Stir in walnuts, apple and raisins.

4. Drop by rounded tablespoonfuls two inches apart onto ungreased baking sheets. Bake in preheated oven 8-10 minutes or until cookies are dark golden brown. Cool on wire racks. (375° pure convection mode for 14 to 16 minutes, for three cookie sheets)

5. To make vanilla glaze, in a small bowl, combine the confectioners’ sugar, butter, vanilla, salt, and warmed apple juice. Drizzle over warm cookies. If not of drizzling consistency, add 1 tsp. warm water, and stir again. Scoop glaze into a zip-loc bag, push the air out, seal, then make a small cut in one bottom corner, and squeeze glaze onto the tops of the cookies. Do this gently, so the bag doesn’t burst.

Wednesday, October 27, 2010

The MOST Addictive Bundt Cake Ever

Quadruple Apple Craisin Bundt Cake, is a mouthful to say, and is, dare I say, better than chocolate. I wouldn't have said that was possible, until I ate my way through this cake. Dense, and moist, like carrot cake, it will stay fresh on your counter for several days, a plus for empty nesters, and the flavors continue to develop and marry. But, I doubt it will last that long on the counter, because your taste buds will start crying out to you "More..more...more" until it's gone, and you will want to bake another one, even though the recipe is time consuming. I just hope these new Honey Crisp apples are going to be available year round, or I'm going to have withdrawals!
Are you sure you want a new addiction? Then read on....my little pretties

Quadruple Apple Craisin Bundt Cake


2 cups King Arthur unbleached white all purpose flour = 9 oz.

2 tsp. baking powder

½ tsp. baking soda

1 tsp. ground cinnamon

1/8 tsp. ground nutmeg – a few (6 to 8) grates of fresh nutmeg

1/8 tsp. ground mace

½ tsp. kosher salt

1 tsp. powdered vanilla

Combine all of the above in a bowl, and use a whisk to combine the ingredients. Set aside.

Note: If you only have liquid vanilla, add it to the wet ingredients, not the dry.


1¼ cups white sugar or 9 oz.

¼ cup brown sugar or 2 oz.

10 Tbsp. (1 ¼ sticks) unsalted butter

2 large eggs

1 cup homemade apple butter (recipe to follow)

2 medium Honey Crisp apples- cored, peeled, and grated

Note: I used Honey Crisp apples, but a baking apple, like a Jonathon or Granny Smith, would probably give a more pronounced apple flavor. But I truly hope you can find Honey Crisp apples.

½ cup Craisins dried cranberries

*apple juice – For baking purposes, I like to use Langers brand, as it comes in a clear plastic container, with a screw on lid. You can take out what you need, and put the rest back in the freezer. If you want juice, ¼ cup of concentrate and ¾ cup water will give you an 8 oz. glass of apple juice, and you don’t have to drink 2 quarts of juice.

Preheat oven to 325 degrees. Prepare non-stick Bundt pan by spraying with baking spray, or butter it. If using a regular Bundt pan, butter and flour the pan, and increase baking temperature to 350 degrees.

Combine butter and both sugars in the large bowl of a stand mixer, with mixing blade attached, cream at medium high speed until it is light and fluffy. Note: If using liquid vanilla, add to butter/sugar mixture. Scrape down bowl. Add eggs, one at a time, and mix until each is well incorporated. Scrape down bowl after each addition.

On low speed, add apple butter, then grated apples.

Add dry ingredients slowly, until flour mixture is barely incorporated, then add the Craisins, and mix to combine.

*If the batter is too thick (the moisture in apples can vary) add up to 3 Tbsp. apple juice, and mix again, just until incorporated. This should still be a very thick batter.

This is a thick batter, so spoon the batter into the prepared Bundt pan, and slam several times on the counter to settle it into the pan, and bake on the lower-middle rack in the preheated oven for 55 to 60 minutes, or until a toothpick inserted in the center comes out clean with no crumbs attached. Cool in pan 10 minutes, then turn out onto serving platter, and let cool completely, uncovered, before glazing.

Glaze, or dust with confectioners’ sugar. Cover.

Glaze

1 Tbsp. unsalted butter, at room temperature

1 cup confectioners’ sugar

2 Tbsp. frozen apple juice concentrate, undiluted, thawed and heated in microwave until quite warm

Mix butter and sugar together until butter is incorporated into the sugar. Slowly add hot apple juice concentrate, stirring until it becomes fully incorporated and is a pourable consistency. Use immediately, as this glaze will set up quickly.

Apple Butter

1 large Red Delicious apple – cored, peeled, and grated

½ cup white sugar

½ cup apple juice

½ tsp. cinnamon

Pinch of kosher salt

In a small saucepan, combine all ingredients, and cook, covered, over medium heat, for ten minutes, stirring occasionally. Uncover, and continue cooking and stirring until it turns dark and thick, and the liquid has evaporated. Remove from heat, cover, and let cool. Use the entire amount for the Bundt cake recipe.

And don't call 911 if you overdose on this cake.....

Monday, October 11, 2010

Crab Cake Dinner Salad

These were truly delicious. Chock full of crab, lightly breaded with fresh bread crumbs, and fried.
Served over a bed of fresh greens, lightly dressed with olive oil and red wine vinegar. A slice of the most delicious, lightly salted sweet and ripe heirloom tomato, so large it dwarfs the crab cakes, and then red bell pepper remoulade and a drizzle of a balsamic vinegar reduction. Yes, this was fit for the food gods, even if my picture of it is not.
I have to try and plant some of these tomatoes next year.

Monday, September 6, 2010

Imagine the Mexican Riviera

That's what you will be doing when you sit down to eat this meal, imagining yourself totally relaxing seaside, in some cozy little Mexican restaurant, dining under a thatch covered patio overlooking the water.
I served this salad with some lime wedges, to squeeze over the top of the grilled shrimp, and it is divine. The achiote paste is worth searching for. You will keep this item in your pantry forever more. If you don't like really hot food, use only half the jalapeño, it will still be plenty warm. Buen Provecho....and sorry, I didn't take a picture.

Shrimp Salad with Corn and Orange Salsa
Serves four, generously


1 pound large shrimp (peeled and deveined)

6 navel oranges, or blood orange would be awesome with this

3 Tablespoons achiote paste

2 ears fresh white corn (cut off cob)

1/2 red onion (sliced thinly)

1 jalapeño pepper (sliced really thin)

1/4 red bell pepper, sliced thin, or diced, to your taste

3 Tablespoons good olive oil

8 oz. salad mix

1 teaspoon salt

3 Tablespoons fresh chopped cilantro


Juice 4 of the oranges and section the other two. Set aside the sections. Dissolve achiote paste in the orange juice. Let it rest for 15 minutes, to extract the flavors. Now, press through a fine mesh sieve to remove any undisolved pieces and spices, and mix in with the corn, onion, bell pepper, jalapeño, oil, salt, orange sections and cilantro. Place in the refrigerator to cool.
Wash and dry the salad greens, and place in a large salad bowl, and keep in the refrigerator until you are ready to serve.
Grill the marinated shrimp over medium high heat, for about 3 minutes per side. Leave lid open while grilling, or shorten the grilling time if you close the grill lid.
Toss the salad with the corn salsa, plate the salad, placing lime wedges around the plate. Place 5 shrimp per plate, and serve.


 Shrimp Marinade


1 Tbsp. achiote paste

3 Tbsp. corn oil

1 tsp. ancho chili powder

¼ tsp. cumin

2 to 3 Tbsp. fresh orange juice

½ tsp. kosher salt


Blend all ingredients in a medium size bowl, and then stir in the shrimp. Let sit at room temperature for 30 minutes, turning occasionally. Preheat grill to medium high. Grill the shrimp for 3 minutes per side, remove, and place on the above salad.

Served with some hot tortillas, or not, this makes a great patio dinner.

I hope this becomes one of your new favorites.
Enjoy your holiday weekend my friends!

Monday, July 19, 2010

For Mexican Food Lovers

Going to the grocery store at the last minute is something I try to avoid. So, I love these products, pictured. I love fresh cilantro, but it goes bad so quickly. But the freeze dried cilantro gives a fresh flavor, unlike regular dried cilantro or coriander. So, try them and see for yourself.
I've included an easy and truly great recipe using these ingredients, too! This is a very mild salsa. Of course, you could make it hotter, but I find it more refreshing on the cooler side, especially on a hot day. There is another version in a previous post, for all fresh ingredients, but I like this version the best.

Avocado Salsa


1 ripe Hass avocado

1 cube of Cilantro bouillon

½ tsp. freeze dried cilantro

½ cup of boiling water

½ chopped Serrano pepper

1 Tbsp. rice wine vinegar

2 Tbsp. finely minced white onion


In a bowl, combine crushed bouillon cube and freeze dried cilantro with the boiling water, stirring to dissolve, and let mixture steep and cool.

In a food processor, place the Serrano pepper, the cooled cilantro bouillon, the avocado and the vinegar. Pulse several times, to combine to a paste. Remove to a clean serving bowl, and stir in the finely minced onion. Taste and season with salt, if desired. Cover and refrigerate until ready to serve.
This salsa doesn't turn brown, so make it ahead of time, if you want.

Serve with all your Mexican food favorites. And of course, with chips. Buen Provecho!

Wednesday, June 9, 2010

Italian Meatballs

This is an easy weeknight meal. Serve with a green salad tossed with Italian dressing, or just a vinegar and oil dressing. Impress yourself and your family with your Italian food. Simple is often the best recipe....and wear a bib! It's no fun if it doesn't dribble....


Italian Meatballs


1 lb. ground beef

1 small mild Italian sausage

1 small hot Italian sausage

1/2 cup fresh bread crumbs-pulse 2 slices of bread in a food processor until is is fine crumbs

1 egg

1/4 cup milk

1/2 tsp. salt

1/2 tsp. garlic powder

1/2 tsp. onion powder

1 tsp. oregano-crushed in the palm of your hands

Mix all ingredients together, shape into golf ball sized meatballs, and place on foil lined

cookie sheet.

Heat oven to 400°. Bake meatballs for 25 minutes. At 10 minutes, open your oven and

shake the sheet pan to redistribute meatballs. Do again at 20 minutes into the cooking

time. When 25 minutes is up, remove, and immediately put into a stockpot with your

favorite jarred pasta sauce. Simmer for 30 minutes, stirring every ten minutes. Serve on sliced sandwich rolls.

Tuesday, June 8, 2010

Cabbage Rolls


There are so many people who have never tried this old fashioned comfort food. This is one of the best recipes you will ever add to your files. Enjoy!

Cabbage Rolls


Bring a large pot, filled half way with water, to the boil. Add about 3 Tbsp. of salt to water. Core the bottom of a green cabbage, and gently place it in the boiling water, core side down. Boil two minutes, remove carefully, and rinse under cold water, or place in ice water bath, for two minutes, and then drain. Carefully remove the outer leaves, without tearing them.

For the sauce:

1 - 15oz. can of tomato sauce

1 Tbsp. light olive oil

1 garlic clove, minced fine

½ tsp. salt

½ tsp. pepper

1 tsp. prepared yellow mustard

1 tsp. white wine vinegar

2 Tbsp. sugar

In sauce pan, place olive oil and heat. Add garlic, and stir until garlic is fragrant, about 30 seconds. Add all other ingredients, and bring to a simmer. Simmer 15 minutes. Depending on the tomato sauce, you may need to add a little more sugar. This sauce should have a faint tang, and a slight sweetness.


For the meat:

1 lb. ground beef

1 cup of cooked white rice

1 egg

½ tsp. paprika

½ tsp. salt

¼ tsp. black pepper

1 Tbsp. finely grated red bell pepper

1 Tbsp. finely grated yellow onion

1 Tbsp. finely chopped white onion

Add everything but the beef to a large bowl. Mix to combine ingredients. Then add the beef, and work the mixture with your hands, until all ingredients are combined.

Divide meat into six to eight portions, depending on how many rolls you want to make.


Place the meat on the inside of the cabbage leaf, forming it into a log shape. Then roll the bottom of the leaf up over the meat, bring the sides in, and then continue to roll up, like a burrito. Continue until all the cabbage rolls are formed.

Place one cup of sauce in the bottom of a large casserole dish, and tilt the dish to distribute the sauce evenly. Place the cabbage rolls in the dish, and pour the remaining sauce over the top.

Put casserole dish, uncovered, into a 350° oven, for 45 minutes. Baste every 15 minutes with the sauce in the dish.

Remove, and serve with home made mashed potatoes, and the sauce.

Monday, June 7, 2010

Avocado Salsa...

Avocado Salsa


This is not guacamole! This can be used on tacos, as a dip for chips, drizzled over any enchiladas, chiliquiles or huevos rancheros.Great to make for parties, you don't need a whole lot of avocados, and everyone likes it.

1 ripe avocado

1 large jalapeño, sliced, seeds and all

1 cup water

1 tsp. white vinegar

2 tsp. rice wine vinegar

3/4 tsp. salt

1/4 tsp. garlic powder

Process in food processor or blender, until emulsified. Jalapeño will be finely minced. Pour into serving bowl.

Now stir in:


2 Tbsp. finely minced white onion

2 Tbsp. finely minced cilantro


Cover and chill until ready to serve.

This makes about 1 1/2 cups, and can easily be doubled.

Buen provecho!

Friday, May 14, 2010

Easy Cheesy Tamales with Poblano Cream Sauce


                                                      Cheese and Corn Tamales


4 lbs. purchased Masa

1 ancho chili

1 8oz. pkg. cream cheese

1 lb. grated jack cheese

2 Tbsp. chopped cilantro

1 pasilla pepper, roasted, peeled and minced

1 lb. pkg. frozen petite white corn

1 egg

1 tsp. kosher salt

Presoaked corn husks


In food processor, grate jack cheese and remove to large bowl. Then insert blade, and process half the corn to resemble creamed corn. Remove and add to large bowl. Place cream cheese, egg, chopped pasilla, salt and cilantro into the food processor and pulse several times to combine. Add to large bowl. Add the remaining whole corn to the bowl. Mix by hand to combine, then refrigerate until ready to use.

Bring 2 cups water to boil. Add the ancho chili. Let soak 10 minutes, and then place in blender with just enough soaking liquid to process the chili into a paste. Push through a fine sieve. Using a mixer, add chili paste to the Masa, one tablespoon at a time, until the desired color and taste, and then continue to beat with mixer to lighten the Masa.

Spread the Masa on the soaked corn husks, and then place the cheese and corn mixture down the middle. Fold, and place on large baking sheet until all tamales are filled.

Line a large pot fitted with steamer insert with corn husks, add tamales, cover with more corn husks, and steam over simmering water for about one hour. Remove to let cool.

Serve with poblano cream.


Poblano Cream

½ roasted pasilla chili

2 cups heavy cream

Blend to combine. Just before serving, place in small saucepan and bring to a bare simmer. Drizzle over tamales.

Blackberry Cobbler


 I have been working on this recipe for a while now. I wanted to downsize it, because most cobbler recipes make far too much. Hubby also likes a lot of crunch to his cobbler, so I had to work on that. I think I have come up with one of the best cobblers that you will ever sink your teeth into. With the explosion of berries right now, I hope you try this.


Favorite Berry Cobbler


1 basket of fresh berries, blackberry, raspberry, blueberry

4 Tbsp. unsalted butter

2 ¼ ozs. a.p. flour-scant half cup

3 ½ oz. sugar- ½ cup

1 tsp. baking powder

¼ tsp. salt

½ cup milk, at room temperature

1 tsp. vanilla


Topping

¼ cup brown sugar, lightly packed

3Tbsp.flour

¼ cup quick oats (not instant)

2 Tbsp. unsalted butter


For topping, melt butter and add to the rest of the ingredients, using a fork to fully incorporate butter. Set aside.


To make cobbler:

Put butter in a 5x7 pyrex dish, and put it in the oven. Turn oven to 350°, and melt butter. In bowl, stir together the flour, sugar, salt and baking powder. Add vanilla to milk, then stir into flour mixture. Remove pan from oven, pour batter into melted butter. Do not stir. Add fruit. Do not stir. Add crumbled topping. Place back in oven for 25 to 35 minutes.

Serves 4
 
 
Substitutions:  I used APPLES instead. I peeled and cored 3 apples, cut into 1/3" dice, (small, so they would cook in 30 minutes) and tossed them with 1/4 tsp. cinnamon.


I used maple flavoring in place of the vanilla. And I added 1/2 tsp. cinnamon to the crumble topping.

Baked as directed for appr. 30 minutes.

I served our guests, with a scoop of vanilla ice cream on top, and it was so delicious. Not a drop was left.

Chewy Chocolate Cherry Cookies

                                                           My New Favorite Cookie


I have a new favorite cookie. I am making these my cookie gifts this year, along with the recipe. I did do something different than this recipe called for, which was to chop the cherries, rather than use them whole. I didn't want to bite into a giant chunk of cherry. They came out wonderful, and you want them soft, so don't overbake. I was surprised by how much I liked these, (really, really liked these) so I wanted to share this with all of you as my cookie "gift" to you all. This is my adapted version of a recipe I found on line. Enjoy!


Chewy Chocolate Cherry Cookies


1 cup all purpose flour

1/3 cup cocoa powder

½ tsp. baking powder

¼ tsp. baking soda

¼ tsp. salt

1 cup sugar

1/3 cup butter, softened

1 tsp. vanilla extract

1 large egg

2/3 cup dried tart cherries, chopped

4 Tbsp. semisweet chocolate chips


Preheat oven to 350 degrees.

Lightly spoon flour into a dry measuring cup, and level with a knife. Combine flour, cocoa, baking powder, baking soda, and salt, stirring with a whisk. Place sugar and butter in a large bowl; beat with a mixer at high speed until well blended. Add vanilla and egg, and beat well. With mixer on low, gradually add flour mixture. Beat just until combined. Fold in cherries and chocolate chips.

Drop by tablespoonfuls 2 inches apart onto baking sheets coated with cooking spray. Bake at 350 degrees for 12 minutes or just until set. Remove from oven, let cool on pans for 5 minutes. Remove from pans, and cool completely on wire racks.

Yield: 30 cookies

Thursday, April 29, 2010

Ready for Cinco de Mayo


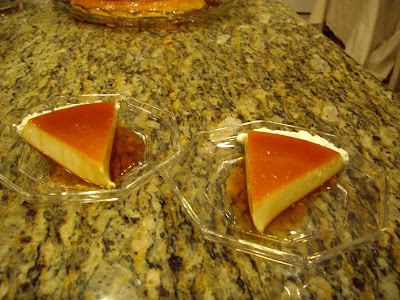
Caramel Flan


Cinco de Mayo is right around the corner. I thought you would enjoy some finished photos of my Caramel Flan.
Buen Provecho!


Served with a little whipped cream, luscious and decadent....


Wednesday, April 28, 2010

Caramel Flan

Caramel Flan


This is an easy recipe. It does require some time to make though, so start the day before you want to enjoy this dessert. This needs 8 hours to chill, the longer it chills, the creamier it becomes.

You will need:

1 cup white sugar
½ cup bakers’ sugar (superfine)
8 eggs
1 can sweetened condensed milk
1 cup heavy cream
1 cup 2% milk
1 ½ tsp. vanilla, or 1 tsp. vanilla combined with ½ tsp. almond extract
10” deep dish pie plate

Preheat oven to 325 degrees.

In an 8”-10” nonstick skillet, place the one cup of sugar, and over medium heat, stir constantly until sugar has melted. It will be the right color as soon as all the sugar has melted. Immediately pour into your pie plate.

Now, put the ½ cup of bakers’ sugar, along with all the other remaining ingredients into a blender, and blend on low speed for 10 to 15 seconds, just long enough to dissolve the sugar. Pour through a strainer, into the baking dish with the caramel.

Put the lid on the dish, and transfer to a baking dish large enough to hold the pie dish. I use the bottom of the broiler pan. Place in the hot oven. Add boiling hot water to the broiling pan, to come half way up the sides of the baking dish.

Bake for 50 to 60 minutes, depending on the heat of your oven. This will look done, and with a light touch of your finger, feel slightly firm, like a cake that is almost done, but not quite. However, it will still be quite jiggly when you move it, like hot liquid pudding. Don’t be alarmed. This continues to cook from residual heat, and really firms up in the refrigerator, so don’t be alarmed by how jiggly it is. If you cook it more, it will be like rubber when it cools. Trust me; this is the secret to a good creamy flan.

Let cool on a rack, uncovered, then transfer to the refrigerator to completely chill, uncovered.

When ready to serve, run a small knife around the edges, and turn upside down on to a serving platter. Lift off the pie plate and use a spatula to scrape out any remaining caramel onto the custard.

Slice and serve, with a dollop of whipped cream if you like.

This makes 12 servings, or 8 very generous, and gut busting servings.

Decorative clay bakers are meant to be used in the oven. This one, with its top, is the perfect choice for flan. And baked this way, with the top on, produces a perfect caramel. If you don’t have one, you should buy one. 
Do not cool with the top on, or condensation will ruin your flan. Do not cover in the refrigerator either, for the same reason. Once turned out, leftovers should be covered in the refrigerator.

Saturday, April 24, 2010

Sweet and Sour Pork

                             Follow Up


The picture doesn't do this justice. I tried frying some cilantro, the way you fry basil or parsley, and this was not good. Not a pleasant taste, but the sweet and sour pork, as well as the tempura fried asparagus, was wonderful.
The sun is out, so go enjoy your weekend. I know I am.

Friday, April 23, 2010

Tonights Dinner

Well, tonights dinner is Sweet and Sour Pork. At least, for us. It's too good to share. Unless, of course, you would like to put up your own jelly, for that's one of the key ingredients of this dish. I am going to give you the recipe for the jelly. If you decide to make it, let me know.
Last night was left overs. We finished off my Dribble Chicken and watched Avatar. What a great feel good movie. Buy it, it's a keeper.
Now, aren't these pretty jars of

Manzano Pepper Jelly

2-3 large red bell peppers, chopped fine in a food processor, to equal 2 cups
1 Manzano pepper, chopped fine
1 jalapeño pepper, chopped fine
1 Serrano pepper, chopped fine
juice of one lime
zest of 1/2 lime
7 cups of sugar
1 1/2 cups of cider vinegar
1 pouch of liquid pectin
Process peppers and then follow the directions found inside the box of liquid pectin to make your jelly. Process in a water bath for 5 minutes. Let cool and check the seals.
Makes 7 to 8 half pint jars.
This is really wonderful stuff, if you've never had it.
Now, if you care to try the sweet and sour pork, and don't want to make this jelly, you can try and find the green pepper jelly, often found in specialty stores and farmers markets, to use in the following recipe.

Sweet and Sour Pork

1 pork tenderloin, cut into 1" pieces
tempura batter (which can be homemade or use purchased box of tempura batter mix)
1 red bell pepper, sliced into strips
1 yellow onion, sliced in half, then cut in strips
1 cup carrots, cut into 1/8 inch slices
1/2 cup green onion (about one bunch), sliced crosswise into 1/8 inch pieces
1/2 cup pineapple chunks
1 cup jasmine rice, cooked according to package directions
corn or peanut oil, enough to deep fry in

Cook rice and keep warm.
Heat oil in deep skillet or wok. Dip pork in tempura batter, and deep fry for 1 to 2 minutes, stirring. Remove to paper towel lined plate.
In separate skillet or wok, stir fry bell pepper, onion, and carrots until cooked crisp tender, using as little oil as possible. Add pineapple, green onion and sweet and sour sauce. Heat through, about one minute. Add battered and cooked pork pieces, toss to coat, and immediately pour over warm rice and serve.

Sweet and Sour Sauce

1 cup Manzano Pepper Jelly
2 Tbsp. dark soy sauce (not regular soy sauce)
2 Tbsp. catsup

Add all ingredients to small saucepan and heat through. Thin with juice from the pineapple can, if you need to, or with chicken broth.

This is the best Sweet and Sour you will ever eat, I can promise you that. You will never want take out again!
May your dinner be as wonderful as mine is going to be....

Friday, April 16, 2010

A Link to the Recipe for Homemade Yogurt

 This is the most delicious, creamy, and mild yogurt I have ever tasted. Nuff said.                        


               Home Made Yogurt made with Lactaid 2% Milk

You will need:

canning jars- 2 8oz. containers with lids and screw tops
a cooking thermometer
Lactaid milk
1 small container of plain yogurt, with active yeast cultures

Sterilize jars in a pot of boiling water for five minutes. Remove jars to clean cloth, and let cool, lid side down. Remove water from heat and put lids and screw tops in water.
Place 2 cups Lactaid milk in a stainless steel pot, and over low heat, heat to 180 degrees, checking with thermometer. Remove from heat, and let the milk cool to 110 degrees.
Stir in 2 Tbsp. of yogurt, that you have pre-measured and allowed to come to room temperature.
Pour into jars, and put the lids on tight.
Place the jars into a 100 degree oven (proof mode) and leave undisturbed for 6 hours. Check the consistency. Leave for another hour, if you want, and check. You can repeat this several times if you want. I took mine out at 7 hours. You can go up to 16, the longer you leave it in, the more sour it will become. I prefer the mild creaminess of the 7 hour ferment.
Remove from oven and place in refrigerator, and chill for at least 8 hours before using.
You can, of course, double or triple this recipe. You just might want to!

Tuesday, April 13, 2010

Bacon Jam burgers, Yes You Read That Right


Bacon Jam


This is a really unique and addictive recipe, a little reminiscent of Kansas City pulled pork, combined with candied bacon, and turned into a pate',  but different enough to make it kind of special.

1 1lb. package of good, smoky bacon, sliced crosswise into 1” pieces

Note:  if you only have regular bacon, add ½ tsp. Stubbs liquid mesquite smoke to the liquid ingredients

½ yellow onion

½ red onion

2 large garlic cloves, chopped fine

2 oz. / ¼ cup apple cider vinegar, and maple syrup

1 Tbsp. ancho chili powder

½ tsp. powdered mustard

¼ tsp. cayenne

1 tsp. paprika

¼ cup of packed brown sugar

Black pepper, to your taste (I used about 6 grinds of fresh black pepper)

Kosher salt – I had low salt bacon, and I had to add ½ tsp. of salt to bring out the flavors

Cook the bacon in a heavy Dutch oven over medium heat until browned, and just beginning to crisp. Remove to paper towels to drain. Remove all but 1 Tbsp. of the bacon grease, then add the onions to the pot, and cook over low, until the onions are translucent and a little caramelized. Add the garlic, and cook for one minute. Add all the spices, and cook, stirring, for another minute.

Add all the liquid ingredients and the sugar, cover and cook on low for 30 minutes. Stir, and continue to cook for another 30 minutes, uncovered, stirring occasionally. Add ¼ cup of water, if you need to, and continue to cook another 30 minutes. Adjust salt, to taste. Continue cooking another 30 minutes, stirring frequently, to reduce the liquid, until it is thick, and the liquid is almost totally evaporated. It will look like very dark bacon at this point. Total cooking time: 2 hours.

Let cool for 15 minutes, then put it the bowl of your food processor, and pulse 2 to 3 times to chop, until it is chunky, more like a salsa, than smooth. You want this to be a little chunky. Remove to jelly jar. This will keep for 1 week, refrigerated. Makes about one and a half to two cups.

Serving suggestions:

On Triscuits

On a bagel, with cream cheese

Put bacon jam on the bottom half of a hamburger bun, add hamburger patty with melted jack or cheddar cheese, I used both, top with lettuce, with mayo on the top bun. Serve. (see photo)

And as a dip with barbecued potato chips. Yes, this is good, with just a caviar size portion per chip.

Easy Ice Cream

Well, I hope you have an ice cream machine, because you'll want to bring it out and use it this spring. Forget going to those pricey ice cream shops, and make your own gourmet ice cream. My favorite ice creams use a custard base, but this ice cream fudges a little on that.
First, I use a 2% milk. For a little fat, but no cholesterol, I add some coconut milk. For the custard, I use instant vanilla pudding. Add a little more vanilla, and no pre-chilling required. It goes straight into your machine, and voilà! Home made and delicious, served with a little Hershey's chocolate syrup and Buttermilk Caramel Sauce. (That recipe is in the previous post.)
Instant Vanilla Ice Cream

3 cups 2% milk
1/2 cup coconut milk
1/2 tsp. vanilla
1/2 cup white sugar
1 small pkg. of instant French vanilla pudding

Whisk the ingredients together for two minutes, and pour into ice cream machine that is already running, and let churn for 30 minutes. Scoop out into freezer safe container, and freeze for at least 6 hours.

Thursday, April 8, 2010

Not so Good.

Not so good. That's how I'm feeling, and apparently how I'm baking.
I didn't have fresh sweet pototo, so I used canned. It turned out I used 3/4 cup of the batter, to turn into chocolate batter. It needed more milk added, to absorb the cocoa powder. It baked up beautifully. It tasted horrible. But the sauce was still awesome.
So, I'm still glad I shared the caramel sauce with you all. Just don't try it with the sweet potato bundt cake, and don't use canned potato, ever.
Destined for todays trash, but there is always tomorrow. Guess I'll have to try the sauce over vanilla ice cream next.
But my day in the kitchen wasn't a total waste. I baked an artisan loaf of bread, made tempura asparagas to munch on, and a tasty beef stew for dinner, served with a big hunk of bread to sop up the gravy. All of those turned out great.
Now you'll have to excuse me, I need a tissue...

Wednesday, April 7, 2010

Re-visiting a recipe

I recently made a:

Buttermilk Glaze


Yield: 1 1/2 cups

1 cup sugar

1 1/2 teaspoons baking soda

1/2 cup buttermilk

1/2 cup butter or margarine

1 tablespoon light corn syrup

1 teaspoon vanilla extract


Bring first 5 ingredients to a boil in a large Dutch oven over medium-high heat. Boil, stirring often, 4 minutes. Remove from heat, and stir in vanilla.

I know this sounds a little odd, but....
This was to die for, and started my brain to work on what I could use it for. Oh my, cinnamon rolls? Oh, yes.
Or, how about re-visiting a recipe? Oh, yes.
So, I am going to make the sweet potato bundt cake again, only I am going to take some the batter, probably two cups of it, and add cocoa powder, probably 4 tbsp., and then spread it the center, so you have it appear when sliced. And then, oh yes, when it is warm out of the oven, poke it with a long toothpick, and pour this warm sauce over the pound cake and let it soak in for a few minutes. Then turn the cake out, and drizzle the top of the cake with more of this sauce. Perhaps I will have to double the recipe. It's that good!
I'll let you know how this works with the bundt cake. But I got so excited, I had to share my idea now, and the recipe for the sauce....